-
Figure 16
Manual Revision 1.2 (26 December 1993)
The following figure illustrates the various elements:
The Experiment Controller supports one or two daughter boards in any combination. The IBM PC adaptor board supports any one of the four daughter boards. Three of the daughter boards provide for a driver, triac, and relay interface to the experimental apparatus. The fourth board provides LEDs and push-button switches for testing controller hardware and software.
This chapter will describe each of the boards and how to wire the power, outputs and options. It also provides construction and parts information about each board.
The basic idea underlying our experiment control system is a distributed network of "smart" apparatuses. The system was designed so that each apparatus (e.g., a pigeon chamber) could be a single physical unit and totally self-contained. We recommend a separate power supply for each controller. Locate the Experiment Controller and its power supply in, on, or close to the experimental apparatus. (We bolt the exposed controller directly to the back of a pigeon chamber with standoffs and without a protective box. We mount the power supply (with its on/off switch) to the side of the chamber. In this way, an apparatus is a single self-contained unit; it can be moved without disturbing anything. All that is necessary is to unplug the 110 power cord and the RS-422 serial wire. An important result of this "packaging" approach is that the many control wires are short and safe from disturbance. We carefully dress and tie down all the cable harnesses. Connectors and wires are a significant source of unreliability, especially if over the weeks and months they get stepped on, can get inadvertently pulled or tripped over, etc.

A negative aspect of the versatility of the Experiment Controller board set and software support is that selecting what to do is difficult
A. Network With Supervisor Computer And Experiment Controller (Etch Revision C1 - 9226 4)
In this case, you will be using a supervisor computer to download an experimental control task to an Experiment Controller that will in turn, carry out the experiment and upload the resulting data.
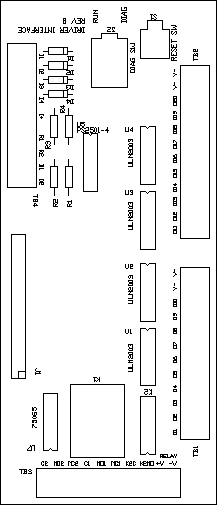
The Experiment Controller is an 80C188EB-based, self-contained computer (see figure above). It is capable of controlling up to 48 outputs and 8 inputs. The board requires only a single 5V power supply to operate. It interfaces to a supervisor computer via an RS-422 serial interface and therefore connects easily to most general-purpose computers. One or two daughter cards can be connected to the Experiment Controller using 40-conductor ribbon cable with insulation displacement connectors. An optional SBX interface socket is provided to allow the easy addition of commercially available analog to digital or digital to analog boards (or the easy addition of lab-built interfaces.) A second RS-422 port is fully supported and can be used for a variety of peripherals (e.g., printer, modem, or analog workbench).
When you get your Experiment Controller you will need to wire it up to a power supply, the experimental apparatus, and to the host computer.
Step 1 is to wire up the power supply. See the Power Supply section in this chapter if you need help selecting one. Attach ground and +5 volts to the appropriate pins on the Controller with approximately 12-14 gauge multi-stranded wire. If you are using an SBX expansion board that requires +12V and -12V attach plus and minus 12 volts to the appropriate pins with approximately 18-20 gauge wire. Some power supplies have sense lines. Simply jumper them to their respective outputs. Some power supplies have separate commons; simply jumper them together (use 12-14 gauge).
Step 2 is to attach the network communication (serial line) signals: TxD+, TxD-, RxD+, and RxD-. In order to simplify moving the apparatus (for modification or repair), we recommend an easy-to-use connector, either the one on the board or one on the end of a wire about the same length as your 110 VAC power cord. Note that TxD+ will connect to RxD+ of the host computer, TxD- to RxD-, RxD+ to TxD+, and RxD+ to TxD+ (use 20-22 gauge wire).
The host computer can be any type of computer (IBM-PC, Macintosh, VAX), but the serial connection must be RS-422. The Macintosh has RS-422 on its printer and modem ports, but IBM-PC and VAX users need to purchase an RS-422 serial board or what is less expensive, purchase an RS-232 to RS-422 converter. Converters should be available for less than $90 (we have found them for $35) (no need to buy the more expensive ones).
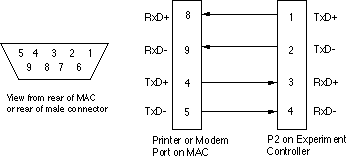
Macintosh With Mini-8 Connector
The figure below shows how to connect an Experiment Controller to a Macintosh Mini-8 connector.
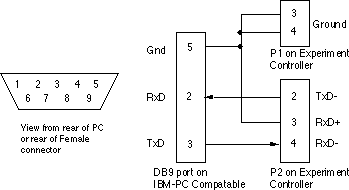
The figure below shows how to connect an Experiment Controller to a Macintosh DB-9 connector.
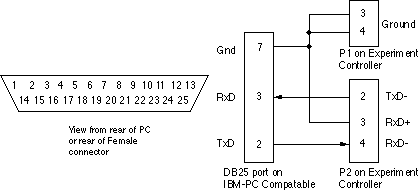
IBM/VAX (RS-232 Connector) If Multiple Controllers
The figure below shows the wiring on one particular RS-422/RS-232 converter for perspective. Do NOT presume that your converter is wired this way.

IBM/VAX (RS-232 Connector) - If Only One Controller
If you are using ONLY a single Experiment Controller, you may connect it directly to an RS-232 port. DO NOT ATTEMPT TO PUT MORE THAN ONE CONTROLLER ON AN RS-232 PORT. It will damage the Controller and/or the RS-232 port. Secondly, mis-wiring (e.g., reversing RS-232 pins 2 and 3) can damage the Controller and/or the Supervisor's serial port. Third, you will have to use a ground wire which is available only on the power connector. Fourth, there are idiosyncrasies about RS/232 (officially it can go only 50 feet under the best of conditions and some RS232 receiver chips (1489) will not work reliably when connected to RS-422). Fifth, sometimes documentation reverses the meaning of Rx and Tx. Finally, if you use this option, do something which will assure that you do not forget the one-controller-only limitation after a few years have passed (i.e., try to add another controller on this RS-232 line). It is recommended that you do not hook up this way unless you or your technical person already knows all these details.
This hookup will probably work. We use is quite often and always presume that it will work, but we offer no guarantees about anything. We do not support it; you are on your own.
If you have a DB-25 (single controller only!)
The third step is to configure the Experiment Controller CPU board. There are a number of options which must be set in hardware. These are done with the small 8-position "DIP" switches on the Experiment Controller. The figure below shows the DIP switch positions and definitions.
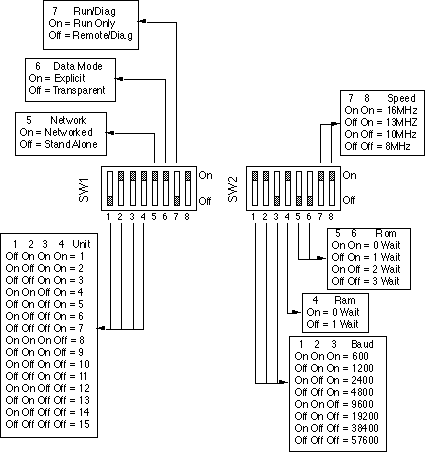
Step 3a: Set the unit number. The unit number is the address used by the network administration software in the supervisor computer to identify a particular Experiment Controller and its apparatus. Because all controllers are on the same network line much like a party line phone, each controller must have its own address. Unit numbers can be any number from 1 to 15, but it is recommended that you number your boards consecutively. You must not have more than one unit with the same number on the same network (and turned on). If you need more controllers on a single line and your use permits it, we can increase the limit above 15 with a PROM change. But, it is important that you plan for current and future worst-case situations, and not create a situation where the network cannot handle the total data rate. It is possible for 15 experiments to overload the network link's bandwidth.
Network Versus Stand-Alone Modes
Step 3b: The next decision relates to how you will be using the Experiment Controller. Two of the switches are involved. First (Step 3b, Part 1), the network switch selects either network mode or stand-alone mode. In networking mode, the controller is normally silent on the network and will talk only when given explicit permission by the host computer. In stand-alone mode the Controller interacts on what it believes to be its personal serial line (the network) all the time. In effect, this is the same as a telephone party line (answer only when it's your ring) or private line (answer all rings). If a Controller is in stand-alone mode there cannot be any other controllers on the network that are powered on. Stand-alone mode is intended for debugging the host/controller hardware. If the unit is in stand-alone mode the ENAB LED on the Controller CPU board will be on all the time (indicating the unit always has permission to use the network link). Multiple stand-alone controllers on the same line will result in gibberish. Do not confuse this hardware option with the "CONNECT" option in RBAS and ExpRun. In those cases, a stand-alone mode is simulated. You need not switch the network/stand-alone switch on the Controller.
Transparent Versus Explicit Data Collection Modes
Secondly (Step 3b, Part 2), the data recording mode switch controls the type of data collection performed. The system is designed for two fundamentally different types of data collection.
Normal-Run Versus Apparatus-Test Mode
Step 3c: In order to facilitate the day-to-day activities of carrying out research, we implemented an apparatus test program in firmware. The researcher need not write a program to test the apparatus. It is available immediately at any time, and built into every daughter board there are switches which can be used to invoke it. In "diagnostic" or apparatus test mode, each time an input is operated the controller turns on the next consecutive output. Any of the 8 inputs cause a step, and all 48 outputs are cycled through. A typical use of the "diagnostic mode" is to switch an apparatus into diagnostic mode with a conveniently mounted switch. Then operate each input while watching each output. Every time you operate an input the next consecutive output should come on. Contact bounce (automatic debouncing times are adjustable with the CONFIG input command) can be seen to result in two light changes for one input.
In a pigeon chamber, the three keys can be operated and the lights behind each key, the magazine, and other lights can be quickly checked. Our typical apparatus test procedure is, therefore, to open the pigeon chamber in the morning, switch the Run/Diagnostic switch located behind the intelligence panel to diagnostics, press the reset button located next to it, (the Experiment Controller "reads" the remote Run/Diagnostic switch every time it is powered up or reset), tap the keys to cycle through all the outputs, switch the Run/Diagnostics switch back to run, and press reset again. The first bird is then loaded and started.
Run mode is the normal program operation mode of the controller. During run mode the Health LED on the Experiment Controller CPU board is normally off and flashes on briefly. During apparatus test or diagnostic mode the Health LED is normally on and flashes off briefly.
The DIP switch for the Run/Diagnostic mode on the Experiment Controller parallels the Run/Diagnostic switch available on daughter board #1. If DIP switch 7 on the controller is ON the controller is locked in Run mode and the daughter board switch is disabled (for cases when you do not ever want to switch into diagnostics remotely). If DIP switch 7 is Off, the daughter board switch controls the Run/Diagnostic mode. Note that if there is no daughter board present and switch 7 is Off, then diagnostic mode will result. Note also that if the daughter board is in run mode, then a remote run/diagnostics switch cannot switch the Controller to diagnostic.
Step 3d: The baud rate specifies the speed at which serial communications to the host computer is performed. All units on a network must be set to the same baud rate, and the host must also be set for that baud rate. The decision on baud rate should be made largely on the capabilities of the host computer. Most IBM-PC compatibles will handle 9600 baud with no problem; 386 and 486 systems should be able to handle 19200 baud. Faster than 19200 on an IBM-PC compatible could cause data loss.
The older Macintoshes (SE, Plus, etc.) should be able to handle 19200 baud on the printer port and 9600 baud on the modem port. Newer Macs should be able to handle 19200 on either port. You can go faster if your data rates require it, but the Macintosh may have problems with sustained high data rates.
Also note that the higher the baud rate, the more "burst mode" overhead in experiment control program execution. Even though data transmission is done in background, it does steal time from program execution. At high baud rates (38400 and 57600) it becomes possible for compute-intensive control programs to run slightly slower. It is unlikely that this would be a problem, because time keeping is independent of the time it takes to execute an ECBASIC instruction and most ECBASIC programs spend most of their time waiting. But, if you are using high baud rates, have compute-intensive control programs, and cannot tolerate any latency to service an input or output, then it would be worth timing worst-case latency and moving the computationally-intensive portions of the program to a less critical time.
ROM and RAM wait states are provided to allow some flexibility in the purchase of EPROM and RAM parts. Wait states are extra delay time increments used in the hardware addressing of the ROM and RAM chips. Faster is better, but faster is also more expensive and harder to find. If you purchased your board from us these are "factory set" and should not be changed. If you are building your own boards the rules for the number of wait states to select are as follows.
ROMs or RAMs with access times faster than 112 ns (nanoseconds) should be set to 0 wait states; chips with access times between 112 and 174 ns should have 1 wait state; chips from 174 to 237 ns should have 2 wait states; and chips from 237-299 ns should have 3 wait states. ROMs slower than 299 ns or RAMs slower than 174 ns cannot be used without firmware modifications.
CPU speed is also "factory set." On the experiment controller the CPU runs at 1/2 the speed of the CPU clock crystal. Since this crystal is also used to control baud rates and program timing functions it is important that the firmware be able to tell what speed of clock has been used. Currently 8, 13, and 16 MHz versions of the CPU chip (80C188EB) are available, and the clock oscillator must be selected to be no faster than two times the speed of the CPU chip. The switches must reflect the actual oscillator speed or else baud rates will be calculated incorrectly and timing will be off. Note that the on board oscillator runs at twice the CPU speed (i.e., 32 MHz oscillator for 16 MHz).
There are four LEDs (light emitting diodes) on the controller to display status information. An LED Enable Jumper is provided to allow the disabling of these displays in cases where the light might affect the experiment. The jumper is installed to enable the LEDs and removed to disable the LEDs.
The Health LED indicates the operation mode of the controller.
The ENAB LED turns on to indicate the controller is transmitting on the serial RS-422 (network link). In stand-alone mode this LED is always on. In network mode this LED is off until the host computer selects the unit.
The TxD LED flashes to indicate the controller is transmitting data to the supervisor computer. This differs from ENAB in that this LED shows the actual data being sent while ENAB shows only that the Controller has permission to transmit. TxD will flicker during data transmission.
The RxD LED flashes to indicate the controller is receiving data from the supervisor computer. Note that when the supervisor sends data all units receive it, but only the addressee uses the information and replies.
(Etch Revision B - 9226 5)
This option allows you to use your IBM PC to actually carry out the experiment control program. Our adaptor board plugs into the printer port and allows you to use our interface boards to control your apparatus with ECBASIC or ECL. This provides a very low-cost experiment control alternative. Alternatively, the IBM/adaptor board in combination with the I/O Tester daughter board provides a good software debugging tool for users with networks of Experiment Controllers. The cost of this option is that the IBM PC is dedicated to experiment control and cannot be used for other things while experiments are running. A second cost is that only one daughter board is supported. An IBM PC adaptor board configuration can be easily upgraded by replacing the adaptor board with an Experiment Controller, and connecting to the serial port rather than the printer port.
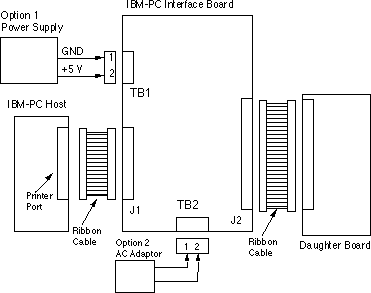
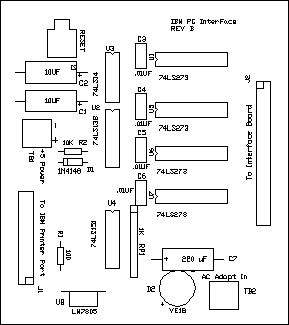
The IBM PC interface adaptor board was designed to allow an IBM PC compatible computer to interface a single daughter board (Figures 26 and 27). The adaptor connects to the printer port of the IBM PC compatible via a ribbon cable. Power to the adaptor can be either +5 volts supplied on TB1, or 9 volts (AC or DC) supplied on TB2. A unregulated wall outlet type supply (i.e., battery substitute) can be used. A 200 ma 9-volt supply should be sufficient. The interface allows a single daughter board to be connected using a ribbon cable (J2).
The adaptor board provides for 24 outputs and 4 inputs as well as support for a Run/Diagnostic switch and a reset switch on the daughter board. The functionality of the reset and diagnostic functions are the same as those on an Experiment Controllers and are simulated by the software on the IBM PC. A separate reset switch and a power on reset circuit is provided to clear the latches on the interface board.
Support for the adaptor card and its daughter board is provided by a special version of the ECBASIC interpreter and the ECL Emulator which runs on the IBM compatible. As a result, standard ECBASIC programs can be run in either transparent (event log) recording mode or explicit (summary) recording.
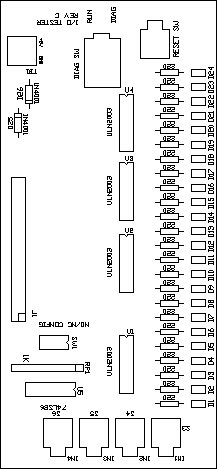
The Tester board was designed to facilitate software and hardware testing.
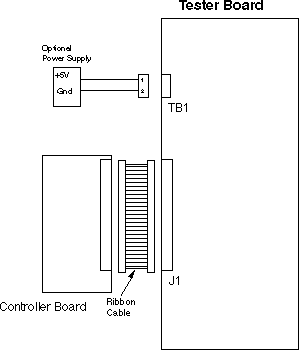
The tester board has 24 LED outputs, 4 push-button switch inputs, a Run/Diagnostic switch and a reset button. Power is supplied either from the controller board (through the ribbon cable) or through TB1. For most usages the power from the controller board is sufficient (and more convenient). A DIP switch is provided to allow you to select whether you want to simulate NO (normally open) or NC (normally closed) inputs. The following table shows the DIP switch functions (presuming that the operandum simulation switches on the tester board (S1-S4) are normally open).
	SW1-1		On -> S1 is NO	Off -> S1 is NC
	SW1-2		On -> S2 is NO	Off -> S2 is NC
	SW1-3		On -> S3 is NO	Off -> S3 is NC
	SW1-4		On -> S4 is NO	Off -> S4 is NC
Output numbers, input numbers, reset button, and run/diagnostic switch are labeled in the silkscreen. If the tester is plugged into J3 of the Experiment Controller, the inputs and outputs are as labeled. If the tester is plugged into J4 of the Controller, then the inputs are N+4 and the outputs are N+24. The reset button works in either J3 or J4, but the run/diagnostic switch will only work if plugged into J3.
The relay daughter board would normally be used in applications where medium current or high isolation are important.
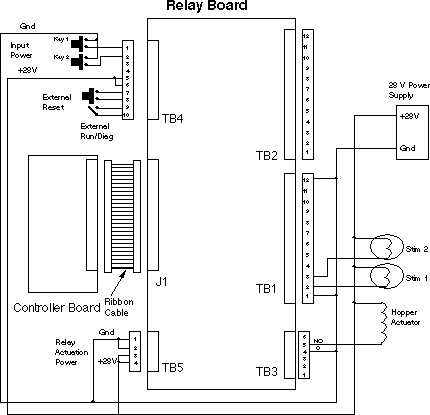
The relay daughter board has twenty 2-amp relays, one 5-amp relay, four optically-isolated inputs, a reset and a run/diagnostic switch The 2-amp relays are DIP relays in sockets. The 5 amp relay is a standard DPDT R10 relay in a socket. Relay actuation voltage can be any voltage from 5 to 48 volts depending on the relay used. The optically-isolated input voltage can be any voltage, regulated or not, from 5 to 32 volts, but resistors R1-R4 may need to be changed to accommodate higher voltages. The following table shows R1-R4 values and supply voltages:
	If you use          Change resistor to
	5 Volts             330 Ohms  (the default value)
	12 Volts            750 Ohms
	24 Volts            1.5K Ohms
	28 Volts            1.8K Ohms
	32 Volts            2K Ohms
Figure 30 shows a typical connection to an experimental apparatus (two inputs, two stimuli, and a food hopper). Note that remote reset and Run/Diagnostic switches are shown. If the interface board is mounted in a convenient location in the apparatus itself (as recommended) the reset and Run/Diagnostic switches on the interface board itself can be used.
Inputs are connected to TB4. For true isolation, the power supply should be separate, but it is typically acceptable to use the power supply used for relay activation, apparatus operation or even the same supply (5-volt) used to run the Experiment Controller. The positive side of the input power supply is connected to TB4 pins 5+6 (either or both). The negative side of the input power supply is connected to one side (the "back" side) of each input switch (e.g., key or lever). The other contact from each switch is connected to TB4 pins 1 through 4 (1 is input 1, etc.).
The power supply for relay actuation (relay coil) is connected on TB5. All relays have a common actuation supply (TB5) and therefore must run at the same voltage. This can be any voltage up to 50 volts depending on the type of relays used on the board. For true isolation, this should be a separate supply. It can be the same power supply that is used to operate the apparatus, and/or the opto-isolators, or it could even be the same as is used by the Experiment Controller (5-volt). A reasonable solution to all these options is to use one 5-volt power supply for the Experiment Controller, and a separate power supply of whatever voltage you want (e.g., 28-volt) for the opto-isolators, relay coils, and apparatus (e.g., lights). Pins 1 and 2 connect to the negative side of the supply, pins 3 and 4 to the positive side.
The relay outputs are as follows: the 5-amp relay is a double pole, double throw (DPDT) relay and has both sides of the two poles available on TB3. The relay is operated by "TURNON 21" (i.e., it is output 21 (or output 45 if it is daughter board 2). If output 21 is off C1 (pin 4) and NC1 (pin 6) are connected as well as C2 (pin 1) and NC2 (pin 3). If output 21 is turned on C1 (4) and NO1 (5) as well as C2 (1) and NO2(2) are connected.
The 20 DIP relays are connected to TB1 and TB2 in groups of five. Each relay has its normally open contact available and each bank of five has its commons connected together and available. Relay one is connected to output 1 (or 25 if it is daughter board 2). If output 1 is off, relay 1 is off and there is no connection between relay 1-5 common (TB1 Pin 1) and relay 1 output (TB1 pin 2). If output 1 is on then the relay connects the common (Pin 1) to the output (Pin 2). The following table shows the pin assignments for relay outputs (i.e., by output):
 Output    Output   Common               Output    Output    Common
  No.      Pin NO                         No.      Pin NO
   1       TB1-2    TB1-1                  11      TB2-2     TB2-1
   2       TB1-3    TB1-1                  12      TB2-3     TB2-1
   3       TB1-4    TB1-1                  13      TB2-4     TB2-1
   4       TB1-5    TB1-1                  14      TB2-5     TB2-1
   5       TB1-6    TB1-1                  15      TB2-6     TB2-1
   6       TB1-7    TB1-12                 16      TB2-7     TB2-12
   7       TB1-8    TB1-12                 17      TB2-8     TB2-12
   8       TB1-9    TB1-12                 18      TB2-9     TB2-12
   9       TB1-10   TB1-12                 19      TB2-10    TB2-12
   10      TB1-11   TB1-12                 20      TB2-11    TB2-12
Table 4 shows the connector assignments for the relay board (i.e., by connector):
TB1-1         Relay 1-5 Common             TB3-1         K21 Common 2
TB1-2         Relay 1 NO                   TB3-2         K21 NO 2
TB1-3         Relay 2 NO                   TB3-3         K21 NC 2
TB1-4         Relay 3 NO                   TB3-4         K21 Common 1
TB1-5         Relay 4 NO                   TB3-5         K21 NO 1
TB1-6         Relay 5 NO                   TB3-6         K21 NC 1
TB1-7         Relay 6 NO                   TB4-1         Input 1
TB1-8         Relay 7 NO                   TB4-2         Input 2
TB1-9         Relay 8 NO                   TB4-3         Input 3
TB1-10        Relay 9 NO                   TB4-4         Input 4
TB1-11        Relay 10 NO                  TB4-5         Input Supply +
TB1-12        Relay 6-10 Common            TB4-6         Input Supply +
TB2-1         Relay 11-15 Common           TB4-7         Remote Run Comm
TB2-2         Relay 11 NO                  TB4-8         Remote Run SW
TB2-3         Relay 12 NO                  TB4-9         Remote Diag Comm
TB2-4         Relay 13 NO                  TB4-10        Remote Diag SW
TB2-5         Relay 14 NO                  TB5-1         Relay Power -
TB2-6         Relay 15 NO                  TB5-2         Relay Power -
TB2-7         Relay 16 NO                  TB5-3         Relay Power +
TB2-8         Relay 17 NO                  TB5-4         Relay Power +
TB2-9         Relay 18 NO
TB2-10        Relay 19 NO
TB2-11        Relay 20 NO
TB2-12        Relay 16-20 Common
The Triac daughter board would be used in applications where AC loads are controlled (e.g., stimulus lights on simply a transformer rather than on a DC power supply).

The triac daughter board has twenty 5-amp triacs, one 5-amp relay, one 2-amp relay, four optically-isolated inputs, a reset push button and a run/diagnostics switch. The 2-amp relay is a DIP style relay on a 16-pin DIP socket. The 5-amp relay is a standard DPDT R10 relay on a socket. The two relays can have any actuation voltage from 5 to 48 volts depending on the relay used. The optically-isolated inputs can be any voltage from 5 volts to 32 volts, but resistors R1-R4 may need to be changed to accommodate higher voltages. See Table 2 (relay board section) for a table of values and supply voltages:
Figure 32 shows a typical connection to an experimental apparatus (two inputs, two stimuli, and a food hopper). Note that remote reset and Run/Diagnostic switches are shown. If the interface board is mounted in a convenient location on the apparatus itself (as recommended) the reset and Run/Diagnostic switches on the interface board can be used.
Inputs are connected to TB3. For true isolation, the power supply should be separate, but it is typically acceptable to use the power supply used for relay actuation, apparatus operation, or even that used to run the Experiment Controller (5-volt). The positive side of the input supply is connected to TB3 pins 5+6 (either or both). The negative side of the input supply is connected to one side of each input switch. The other contact from each switch is connected to TB3 pins 1-4 (1 is input 1, etc.).
The power supply for relay actuation (relay coil) is connected on TB4. Both relays have a common actuation supply (via TB4) and therefore must run at the same voltage. For true isolation, this should be a separate power supply. This can be any voltage up to 50 volts depending on the type of relays used on the board. It can be the same power supply that is used to operate the apparatus or the opto-isolators, or even the Experiment Controller (5-volt). A reasonable solution to all these options is to use one 5-volt power supply for the Experiment Controller, and a separate power supply of whatever voltage you want (e.g., 28-volt) for the opto-isolators, relay coils, and any other DC that you need. Pin 10 connects to the negative side of the supply, pin 9 to the positive side.
The R10 relay is a DPDT (double pole, double throw) relay and has both sides of the two poles available on TB4. The relay is controlled by output 21 (or output 45 if daughter board 2). If output 21 is off C1 (pin 4) and NC1 (pin 6) as well as C2 (pin 1) and NC2 (pin 3) are connected. If output 21 is turned on C1 (4) and NO1 (5) as well as C2 (1) and NO2(2) are connected.
The DIP relay is controlled by output 22 (or output 46 if daughter board 2). When output 22 is turned on TB4 pins 7 and 8 are electrically connected.
The heat sink for each of the triacs is optional. Testing here shows 200 ma can be switched with no overheating problem. Higher currents may be possible with good air-flow. Currents up to 5A are possible with sufficient heat sinks and air flow.
The 20 triacs are connected to TB1 and TB2. Each has one side connected to a common (neutral) connection and the other side available on an output pin. Common connections are available on TB1 pins 1 and 2 as well as TB2 pins 1 and 2. Note that since triacs switch AC there is no polarity. Any voltage up to 240 volts AC can be used, however an isolation transformer is recommended and great care should be taken. High voltage is dangerous. The following table shows the pin assignments for triac outputs:
 Output   Output               Output    Output
  No.     Pin                   No.       Pin
   1      TB1-3                  11      TB2-3
   2      TB1-4                  12      TB2-4
   3      TB1-5                  13      TB2-5
   4      TB1-6                  14      TB2-6
   5      TB1-7                  15      TB2-7
   6      TB1-8                  16      TB2-8
   7      TB1-9                  17      TB2-9
   8      TB1-10                 18      TB2-10
   9      TB1-11                 19      TB2-11
   10     TB1-12                 20      TB2-12
Table 6 shows the connector assignments for the Triac board:
TB1-1         Triac Common                 TB3-1         Input 1
TB1-2         Triac Common                 TB3-2         Input 2
TB1-3         Triac 1                      TB3-3         Input 3
TB1-4         Triac 2                      TB3-4         Input 4
TB1-5         Triac 3                      TB3-5         Input Supply +
TB1-6         Triac 4                      TB3-6         Input Supply +
TB1-7         Triac 5                      TB3-7         Remote Run Comm
TB1-8         Triac 6                      TB3-8         Remote Run SW
TB1-9         Triac 7                      TB3-9         Remote Diag Comm
TB1-10        Triac 8                      TB3-10        Remote Diag SW
TB1-11        Triac 9                      TB4-1         K1 Common 2
TB1-12        Triac 10                     TB4-2         K1 NO 2
TB2-1         Triac Common                 TB4-3         K1 NC 2
TB2-2         Triac Common                 TB4-4         K1 Common 1
TB2-3         Triac 11                     TB4-5         K1 NO 1
TB2-4         Triac 12                     TB4-6         K1 NC 1
TB2-5         Triac 13                     TB4-7         K2 Common
TB2-6         Triac 14                     TB4-8         K2 NO
TB2-7         Triac 15                     TB4-9         Relay Power +
TB2-8         Triac 16                     TB4-10        Relay Power -
TB2-9         Triac 17
TB2-10        Triac 18
TB2-11        Triac 19
TB2-12        Triac 20
The Driver daughter board would be used in applications where low current DC loads are controlled (such as bayonet-base lamps in IDD cells.
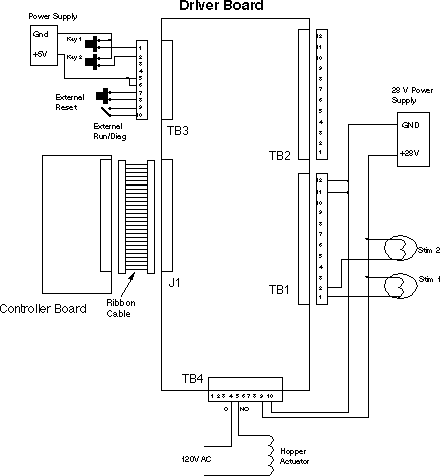
The Driver daughter board (above figure) has twenty 200-milliamp drivers, one 5-amp relay, one 2-amp relay, four optically-isolated inputs, a reset pushbutton and a run/diagnostics switch. The 5-amp relay is a standard DPDT R10 relay on a PC socket. The 2-amp relay is a DIP style relay on a 16-pin DIP socket. The two relays can have any actuation voltage from 5 to 48 volts depending on the relay used. The optically-isolated inputs' voltage can be any voltage, regulated or not, from 5 to 32 volts, but resistors R1-R4 may need to be changed to accommodate higher voltages. See Table 2 (relay board section) for a table of values and supply voltages:
Figure 34 shows a typical connection to an experimental apparatus (2 inputs, 2 stimuli, and a food hopper). Note that remote reset and Run/Diagnostic switches are shown. If the interface board is mounted in a convenient location in the apparatus itself (as recommended), the reset and Run/Diagnostic switches on the interface board can be used.
Inputs are connected to TB3. For true isolation, the power supply should be separate, but it is typically acceptable to use the power supply used to actuate the relays, operate the outputs in the apparatus, or even the same supply as used to run the Experiment Controller. The input supply positive side is connected to TB3 pins 5+6 (either or both). The negative side of the input supply is connected to one side of each input key. The other contact from each key is connected to TB3 pins 1-4 (1 is input 1, etc.).
The power supply for relay actuation (relay coil) is connected on TB4. Both relays have a common actuation supply (via TB4) and therefore must run at the same voltage. This can be any voltage up to 50 volts depending on the type of relays used on the board. It can be the same power supply that is used to operate the apparatus or the opto-isolators or the Experiment Controller itself. A reasonable solution to all these options would be to use one power supply for the Experiment Controller (5-volt) and a separate power supply of whatever voltage you want (e.g., 28-volt) for opto-isolators, relay coils, and apparatus (e.g., lights) Pin 10 connects to the negative side of the supply, pin 9 to the positive side.
The R10 relay is a DPDT (double pole, double throw) relay and has both sides of the two poles available on TB4. The relay is controlled by output 21 (or output 45 if daughter board 2). If output 21 is off C1 (pin 4) and NC1 (pin 6) as well as C2 (pin 1) and NC2 (pin 3) are connected. If output 21 is turned on C1 (4) and NO1 (5) as well as C2 (1) and NO2(2) are connected.
The DIP relay is controlled by output 22 (or output 46 if daughter board 2). When output 22 is turned on TB4 pins 7 and 8 are electrically connected.
The 20 drivers are connected to TB1 and TB2. Each driver has one side connected to a common (neutral) connection and the other side available on an output pin. Common connections are available on TB1 pins 11 and 12 as well as TB2 pins 11 and 12. Note that since the drivers switch DC the common connection must be connected to the negative (ground) side of the power supply controlling the load. The following table shows the pin assignments for driver outputs:
 Output   Output               Output    Output
  No.     Pin                   No.       Pin
   1      TB1-1                  11      TB2-1
   2      TB1-2                  12      TB2-2
   3      TB1-3                  13      TB2-3
   4      TB1-4                  14      TB2-4
   5      TB1-5                  15      TB2-5
   6      TB1-6                  16      TB2-6
   7      TB1-7                  17      TB2-7
   8      TB1-8                  18      TB2-8
   9      TB1-9                  19      TB2-9
   10     TB1-10                 20      TB2-10
Table 8 shows the connector assignments for the Driver board:
TB1-1         Output 1                     TB3-1         Input 1
TB1-2         Output 2                     TB3-2         Input 2
TB1-3         Output 3                     TB3-3         Input 3
TB1-4         Output 4                     TB3-4         Input 4
TB1-5         Output 5                     TB3-5         Input Supply +
TB1-6         Output 6                     TB3-6         Input Supply +
TB1-7         Output 7                     TB3-7         Remote Run Comm
TB1-8         Output 8                     TB3-8         Remote Run SW
TB1-9         Output 9                     TB3-9         Remote Diag Comm
TB1-10        Output 10                    TB3-10        Remote Diag SW
TB1-11        Driver Common                TB4-1         K1 Common 2
TB1-12        Driver Common                TB4-2         K1 NO 2
TB2-1         Output 11                    TB4-3         K1 NC 2
TB2-2         Output 12                    TB4-4         K1 Common 1
TB2-3         Output 13                    TB4-5         K1 NO 1
TB2-4         Output 14                    TB4-6         K1 NC 1
TB2-5         Output 15                    TB4-7         K2 Common
TB2-6         Output 16                    TB4-8         K2 NO
TB2-7         Output 17                    TB4-9         Relay Power +
TB2-8         Output 18                    TB4-10        Relay Power -
TB2-9         Output 19
TB2-10        Output 20
TB2-11        Driver Common
TB2-12        Driver Common
Voltage
The choice of voltages to use on the output daughter boards could depend on the voltages you are required to use in your apparatus, or the voltages you use in your apparatus could depend on the voltages you had decided to use on the daughter boards.
There is a simple relationship between the current required by your apparatus and the voltage which it uses. Higher voltages mean lower currents. Lower current generally mean less expensive actuators (drivers cost less than relays). This relationship could affect your choice of output daughter boards. If you use 28-volt bayonet base lamps, then the driver board (less expensive) is probably sufficient.
Indicator lamps typically vary from 6 to 28 volts and draw up to 250 milliamps. We happen to use 1815 lamps (the C-2F filament version) because they fit into IDD cells, they are very bright and using our existing supply was less expensive than changing to some other bulb. Typical bayonet base lamps and their current are provided below.
Lamp           Volt           Amps
44             6.3            .25
47             6.3            .15
1815(C-2F)     14.0           .20
1819           28.0           .04
1820           28.0           .10
1829           28.0           .07
1864           28.0           .17
1866           6.3            .25
Simply sum up all the output currents which could ever be on together (worse case) (e.g., 0.25-amp per lamp and between 1 to 3 amps for DC solenoids) and use a power supply capable of about 50% more. Keep in mind that if lamps cannot flicker when other outputs are operated, a relatively good power supply is necessary.
Maximum protection from glitching can be provided by using one power supply for the Experiment Controller (5 volts at about 1.5 amps) and an entirely different power supply for relay power and the opto-isolators on the daughter boards, and the lights and feeders in the apparatus (e.g., 28 volts, 6 to 8 amps).
More than adequate isolation is provided by a single power supply that provides both 5 volts and 28 volts. In fact, we happen to use one 5-volt power supply for both the Controller and relay power.
Depending on the details of the application, the auxiliary serial port might be used to interface any of a wide variety of special purpose I/O devices. These could vary from as simple as a voltmeter to as complex as an entire analog "workbench" (e.g., Keithley Instruments). Alternatively, a printer could be attached if logs of a chronically-running experiment independent of a Supervisor Computer were desired. When wiring the auxiliary serial connector (P2) on the Experiment Controller, follow the same rule of connecting Rx+ to Tx+ and Rx- to Tx- as used for the Macintosh if it is RS-422; or connect it in the same way as was used for a single controller on an IBM PC if it is RS-232. Note, however, that care must be exercised if you attempt to connect RS-422 to RS-232. It will probably work but there are many ways for it to go wrong.
While this option is quite powerful, it requires a relatively good understanding of the hardware and software. Additionally, the potential applications are too numerous to predict. If you have a serious interest, call or e-mail for information.
Ribbon cables are very easy to make. Simply cut the cable to the length you want, then slide the connector on to the end of the wire. Make sure that the connector will plug into the socket with the wire exiting in the way you want, and that pin 1 on both ends connect to the same wire. Check that it is lined up correctly and squeeze it closed in a vice.
Note that many vendors sell pre-made ribbon cables and custom made cables.
Our experience with the board has been very favorable. The overwhelming majority of boards come up running. Those that don't come up are virtually always a bad chip or a leg bent under. None of our boards have been flaky and none have died.
Unfortunately, an occasional board built externally has been flaky. This could have been due to substitute parts not within specifications, or soldering, or power supply, and wiring problems.
The first board you build is likely to take an average person about 6 hours; the rest should take about 3 hours each.
Be extremely careful when inserting components and soldering. These two operations account for almost all board problems. Use a temperature-controlled iron or use an iron which is hot enough to quickly melt the solder but not so hot as to scorch the board. Keep the tip clean and do not let solder drip off the end of the iron onto the board. Heat solder enough to allow flux to boil off but not so much as to run excessive solder through the board or melt the socket. Use active flux but do not under any circumstances use acid core solder. Mechanically move socket pin or component with soldering iron just before lifting iron from joint in order to assure good solder flow.
Be extremely careful when inserting components and soldering. These two operations account for almost all board problems. (This was worth saying twice.) Notice that the CPU chip has one flattened corner - make sure the socket is installed with the flat corner in the position marked on the silkscreen, and that the CPU chip is inserted in the correct orientation. Never attempt to remove the CPU without the proper tool. Never touch the pins of the CPU chip. Never insert or remove a chip with the power turned on.
We use sockets in order to make debugging and repair easier. (Do not scrimp on sockets, or they will be a never ending source of headaches.) Screw machine sockets are the best, double wipe sockets are good enough; gold plate is best but not necessary. Personally, I refuse to use Texas Instruments' sockets or any economy sockets.
Our custom is to:
Two important facilities are available for debugging: 1. The Controller contains diagnostic firmware. With the Run/Diagnostic mode switch set in the diagnostics mode, the controller waits for any input (response). When an input occurs it turns on the first output (stimulus). With the next input it turns off output 1 and turns on output 2 and so on for all 48 outputs following any of the 8 inputs. In this way an apparatus and controller can be quickly tested whenever the question "hardware or software" arises. 2. Immediate mode commands like TURNON can be used to turn on stimuli in the apparatus to test the output drivers or the apparatus. Other immediate mode commands like LIST can be used to confirm that the experimental control programs were transmitted to the computer correctly.
It is intended that when you have a hardware failure, you simply replace the bad board with a spare, so that you can keep running. The boards are inexpensive enough to maintain a spare, especially when the cost of lost research time is considered. A second reason for a spare is that the best diagnostic aid when a hardware problem is suspected, is a second board which works. Switching boards identifies whether the problem is the board or something else. If it is found that the board is bad, it can be tested and fixed at a more convenient time in a more convenient situation. Moving chips from a working board to a non working board (in groups) identifies bad chips. Comparing the electrical activity on various traces could help identify the remaining problems.
Keep in mind, however, that these boards are inexpensive enough to throw away rather than try to fix at some point. If it's known to be the board itself and its something other than the chips, something very serious happened.
The first thing to discover is whether it is the apparatus, the Experiment Controller, or the Supervisor computer.
If the Supervisor was never known to work (i.e., you are setting up):
If it is the apparatus, you are on your own. Consult the hook-up information given with the daughter board installation in the event that something provided there will help.
If the Experiment Controller is not known to work:
Minimal Chip Complement
The Experiment Controller can "run" minimally with the following chips removed (or not yet installed):
If you wish, you could populate the board with the exception of these chips and their sockets, then test it. If a problem occurs, there would be fewer parts to check.
1 Experiment Controller PC Board (Rev C1)
Resistors
3 750-101-R1K 1K Sip resistor 10 pin (CTS) (710A102)
1 750-61-R1K 1K Sip resistor 6 pin (CTS) (706A102)
1 750-61-R220 220 Ohm Sip resistor 6 pin (CTS) (706A221)
1 220 ohm 1/4 watt
1 2.2K ohm 1/4 watt
1 10K ohm 1/4 watt
Capacitors
2 22uF 25V
14 .1uF
1 .01uF
Diodes
1 1N4148 Diode
1 ICTE-5 Transorb
4 non-resistor LED
Integrated Circuits
1 80C188EB Intel CPU
1 27010 128K EPROM 100ns
1 TC551001 Static RAM (128K CMOS Static Ram 100ns)
2 74AC373 Octal Latch (TI)
1 74AC245 Octal Transceiver (TI)
1 74LS138 3 to 8 Line Decoders
6 74LS374 Octal Latch
3 74LS541 Octal Buffer
1 74LS07 Hex Buffer/Driver
1 75173 Quad Line Receiver
1 75174 Quad Line Driver
1 74LS132 Quad Nand/Schmitt Triggers
1 32MHz Oscillator
Sockets
1 84 Pin PLCC (Aries 84-535-10)
2 32 Pin
12 20 Pin
4 16 Pin
2 14 Pin
Connectors
2 40 Pin right angle male header (T&B Ansley 609-4024ES)
1 4 position plug (Electrovert/Weiland 8213B/4)
1 4 position socket (Electrovert/Weiland 8213S/4WOB)
1 6 position plug (Electrovert/Weiland 8213B/6)
1 6 position socket (Electrovert/Weiland 8213S/6WOB)
1 36 Position Board expansion female socket (optional) (T&B Ansley 609-BX360)
Miscellaneous
1 Jumper
2 8 position DIP switches
1 IBM PC Interface PC Board (Rev B)
Resistors
1 750-101-R1K 1K Sip, 10 pin (CTS #710A102)
1 100 ohm 1/4 watt
1 10K ohm 1/4 watt
Capacitors
2 10uF 25V
4 .01uF
1 220uF 25V (Optional with AC/DC Adaptor)
Diodes
1 1N4148
1 VE08 Bridge Rectifier (Varo) (Optional with AC/DC Adaptor)
Integrated Circuits
4 74LS273 Octal Latch
1 74LS138 1 to 8 Decoder
1 74LS14 Hex Schmitt Trigger
1 74LS151 Data selector
1 LM7805 Voltage Regulator (Optional with AC/DC Adaptor)
Sockets
4 20 Pin
2 16 Pin
1 14 Pin
Switches
1 TPB11CG-RA-0 Right angle PC mount pushbutton (Alcoswitch)
Connectors
1 609-4024ES 40 Pin straight male header (T&B Ansley)
1 609-2624ES 26 Pin straight male header (T&B Ansley)
1 8213B/2 2 position plug (Electrovert/Weiland) (either TB1 or TB2)
1 8213S/2WOB 2 position socket (Electrovert/Weiland) (either TB1 or TB2)
Heat Sinks
1 THM 6025B Thermalloy Heat sink TO-220 (Optional with AC/DC Adaptor)
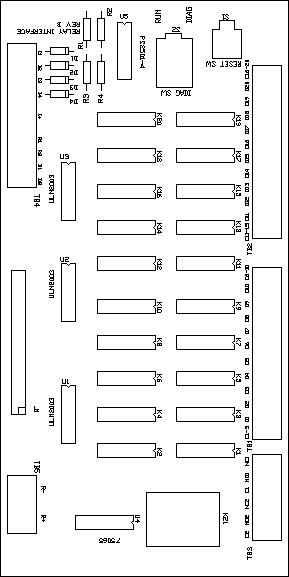
1 Relay Interface PC Board (Rev C)
Resistors
1 750-101-R1K 1K Sip, 10 pin (CTS) (710A102)
24 220 ohm 1/4 watt (red red brown)
Diodes
2 1N4001 Diode (1 is optional with +5-volt supply)
4 non-resistor LED
Integrated Circuits
4 ULN2003 Darlington Array (Sprague, TI)
1 74LS86 Quad XOR
Switches
1 MTA-106D-RA Right angle PC mount switch (Alcoswitch)
5 TPB11CG-RA-0 Right angle PC mount pushbutton (Alcoswitch)
1 4 position DIP switch
Connectors
1 609-4024ES 40 Pin straight male header (T&B Ansley)
1 8213B/2 2 position plug (Electrovert/Weiland) (optional)
1 8213S/2WOB 2 position socket (Electrovert/Weiland) (optional)
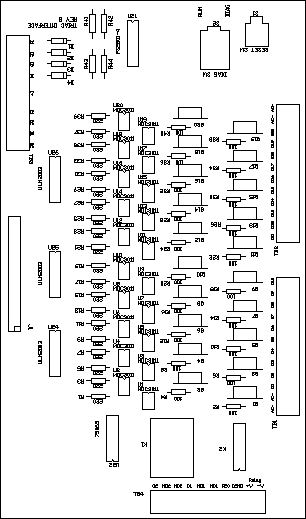
1 Relay Interface PC Board (Rev B)
Resistors
4 330 ohm 1/2 watt (orange orange brown) (for 5-volt input power supply)
Diodes
4 1N4001 (or 1N4002 or 1N4003)
Integrated Circuits
3 ULN2003 Darlington Array (Sprague, TI)
1 75065 Quad driver (TI) (ULN2065)
1 PS2501-4 Quad optoisolator (NEC)
Relays
1 R10 DPDT Relay (Potter Brumfield R10-E1X2-V28 for 5V operation)
20 double pole (or single pole) double throw dip style
Sockets
1 27E128 Socket for R10 DPDT Relay (Potter Brumfield)
1 20C249 Hold down spring for R10 Relay (Potter Brumfield)
25 16 Pin sockets
Switches
1 MTA-106D-RA Right angle PC mount switch (Alcoswitch)
1 TPB11CG-RA-0 Right angle PC mount pushbutton (Alcoswitch)
Connectors
1 609-4024ES 40 Pin straight male header (T&B Ansley)
1 8213B/4 4 position plug (Electrovert/Weiland)
1 8213S/4WOB 4 position socket (Electrovert/Weiland)
1 8213B/6 6 position plug (Electrovert/Weiland)
1 8213S/6WOB 6 position socket (Electrovert/Weiland)
1 8213B/10 10 position plug (Electrovert/Weiland)
1 8213S/10WOB 10 position socket (Electrovert/Weiland)
2 8213B/12 12 position plug (Electrovert/Weiland)
2 8213S/12WOB 12 position socket (Electrovert/Weiland)
1 Triac Interface PC Board (Rev B)
Resistors
20 220 ohm 1/4 watt (red red brown)
20 100 ohm 1/4 watt (brown black brown)
4 330 ohm 1/2 watt (orange orange brown) (for 5-volt input power supply)
Diodes
4 1N4001 (or 1N4002 or 1N4003)
Triacs
20 Q2010L5 Triacs
Integrated Circuits
3 ULN2003 Darlington Array (Sprague, TI)
1 75065 Quad driver (TI) (ULN2065)
1 PS2501-4 Quad optoisolator (NEC)
20 MOC3011 Triac Driver (Motorola)
Relays
1 R10 DPDT Relay (Potter Brumfield R10-E1X2-V28 for 5V operation)
1 double pole (or single pole) double throw dip style
Sockets
1 27E128 Socket for R10 DPDT Relay (Potter Brumfield)
1 20C249 Hold down spring for R10 Relay (Potter Brumfield)
6 16 Pin sockets
20 6 Pin sockets
Switches
1 MTA-106D-RA Right angle PC mount switch (Alcoswitch)
1 TPB11CG-RA-0 Right angle PC mount pushbutton (Alcoswitch)
Connectors
1 609-4024ES 40 Pin straight male header (T&B Ansley)
2 8213B/10 10 position plug (Electrovert/Weiland)
2 8213S/10WOB 10 position socket (Electrovert/Weiland)
2 8213B/12 12 position plug (Electrovert/Weiland)
2 8213S/12WOB 12 position socket (Electrovert/Weiland)
Heat Sinks
20 THM 6025B Thermalloy Heat sink TO-220 (optional)
1 Driver Interface PC Board (Rev B)
Resistors
4 330 ohm 1/2 watt (orange orange brown) (for 5-volt input power supply)
Diodes
4 1N4001 (or 1N4002 or 1N4003)
Integrated Circuits
4 ULN2003 Darlington Array (Sprague, TI)
1 75065 Quad driver (TI) (ULN2065)
1 PS2501-4 Quad optoisolator (NEC)
Relays
1 R10 DPDT Relay (Potter Brumfield R10-E1X2-V28 for 5V operation)
1 double pole (or single pole) double throw dip style
Sockets
1 27E128 Socket for R10 DPDT Relay (Potter Brumfield)
1 20C249 Hold down spring for R10 Relay (Potter Brumfield)
7 16 Pin sockets
Switches
1 MTA-106D-RA Right angle PC mount switch (Alcoswitch)
1 TPB11CG-RA-0 Right angle PC mount pushbutton (Alcoswitch)
Connectors
1 609-4024ES 40 Pin straight male header (T&B Ansley)
2 8213B/10 10 position plug (Electrovert/Weiland)
2 8213S/10WOB 10 position socket (Electrovert/Weiland)
2 8213B/12 12 position plug (Electrovert/Weiland)
2 8213S/12WOB 12 position socket (Electrovert/Weiland)
Small quantities of a wide variety of parts:
VOICE-------FAX-------COMPANY
800-677-8899 617-933-8884 Active
800-826-5432 818-781-2653 All Electronics
800-776-3700 201-601-8990 American Design Components
214-271-5546 214-271-2462 B.G. Micro
800-426-6375 619-268-0874 Chip Merchants (very good prices)
800-431-2912 914-235-2138 Derf Electronics
800-874-3373 407-330-2607 Derf Electronics
800-344-4539 218-681-3380 Digi-Key
800-645-4722 516-731-5125 Edlie
800-831-4242 800-237-6948 Jameco
800-538-5000 800-538-5005 JDR
918-267-4961 918-267-3879 Microprocessors Unlimited
800-346-6873 ---------- Mouser
800-824-3432 818-998-7975 Unicorn Electronics
Larger quantities - stock varies daily
VOICE-------FAX-------COMPANY
800-347-3423 714-558-1603 ACP
800-767-2637 813-572-9696 America II (integrated circuits)
215-956-1930 215-956-1931 Eclipse Electronics
800-288-1187 813-572-9944 IC Exchange
--------- 800-892-8889 IC Express (memory)
--------- 619-552-1219 Micro C (memory)
415-348-6333 415-348-1809 Microware Exceltek
800-922-6327 508-922-1341 NECS
--------- 818-703-5920 PRO (integrated circuits)
215-468-4645 215-468-8487 Selectronics (Jennifer)
818-700-7926 818-882-8440 Phoenix Enterprises
415-324-4981 800-447-4776 Solid Electric (connectors)
503-835-7431 503-835-7580 ZZYZX Co. (sockets, connectors)
Date Last Reviewed : June 2, 2004